Complete this procedure if you selected a Batch Type of Payment on the Standing Journal screen. Payment batches are used to enter manual (i.e. non-creditor) payments and direct debits directly into the General Ledger. Examples of payment transactions include manual cheques (e.g. wages) and direct debits (e.g. bank charges and lease payments).
To enter payment journals:
Refer to "Creating a New Standing Journal Template" or "Recalling a Standing Journal Template".
Micronet displays the Standing Journal screen.
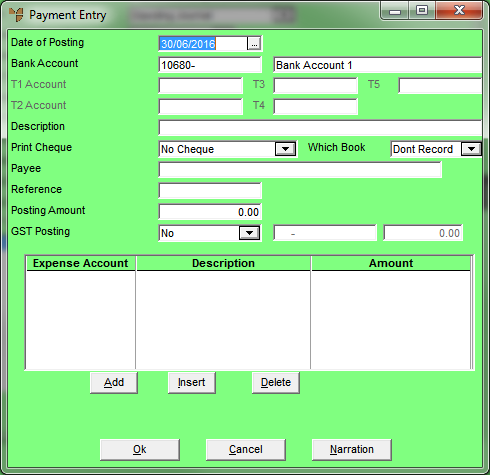
If you selected to add, insert or edit a payment, Micronet displays the Payment Entry screen.
|
|
Field |
Value |
|
|
Date of Posting |
Micronet defaults to the system date on the computer’s clock. Overwrite this date by selecting a date or by entering a date in the format DDMMYY. |
|
|

|
Warning Regardless of the date entered, Micronet posts the transaction to the period selected on the batch header. |
|
|

|
Technical Tip When entering many transactions for a date that is not the same as the computer clock's date, you can set the date manually - refer to "Maintenance - Change Local Date (Set Local Date)". |
|
|
Bank Account |
Micronet displays your nominated bank account. If paying this batch of cheques from a different bank account, enter the other bank account number. The selected bank account is used for all payment transactions in the current batch. Micronet automatically credits the selected bank account for the payment after entering the expense account to post the debit to. If the Bank Account field is blank, check your company configuration (refer to "Edit - Applications - MGL - Special Accounts"). |
|
T1, T2, T3, T4, T5 Account |
If T accounts are enabled in your system, select a T1, T2, T3, T4 and/or T5 account to be associated with the (credit) bank posting. If you enter an incorrect account, Micronet displays a list of all available T accounts. |
|
|
|
Description |
Enter a meaningful description of the standing journal transaction. This description displays on account inquiries. |
|
|
Print Cheque |
Select Yes:Batch or Print Now if you want Micronet to print a cheque immediately. Note that the default is No cheque. |
|
|
|
Warning If you set this field to Print Now, your only options for this batch on completion will be to save the batch and post it to the General Ledger. You will not be able to cancel or delete the batch because Micronet has already printed a cheque from it. If you try to delete a batch where the Print Now option has been selected for a line in the batch, Micronet will display the message "You have already printed a cheque from this batch. You cannot cancel it now". |
|
|
Which Book |
If you selected Yes:Batch or Print Now in the Print Cheque field, you can select a cheque book. |
|
Payee |
If you selected Yes:Batch or Print Now in the Print Cheque field, enter the details of the payee. |
|
|
Reference |
Enter the journal reference number. The reference for standing journal transactions is usually the journal folio number. The reference displays on account inquiries. The reference increments by one on subsequent transactions. |
|
|
Posting Amount |
Enter the amount of the standing journal transaction. If an amount is not entered at this stage, Micronet prompts you to enter an amount when processing the standing journal transaction. Zero amounts are not posted. |
|
|
GST Posting |
Select whether GST is applicable to the payment amount. Options are:
|
|
|
[GST Posting Account] |
Micronet displays the GST Input Credits account as defined in your company configuration (refer to "Edit - Applications - MGL - Special Accounts"). |
|
|
[GST Posting Amount] |
The GST Posting amount is calculated as 1/11 of the total posting amount. If the GST Posting amount is not 1/11, override the GST amount to the correct amount for the transaction. |
Refer to "Payment Entry - Expense Entry".
Refer to "Payment Entry - Narration".
If you selected to add a payment, Micronet redisplays the Payment Entry screen so you can add further payments.
Micronet redisplays the Standing Journal screen showing all the payments added.
Refer to "Managing Completed Standing Journal Templates".